I got involved in Origami a couple of years back when I came across a marvelous model of a hyperbolic parabola. What really appealed to me was the fact that this complex structure had been created from a simple, flat square piece of paper only by way of folds and creases. Further search on the Internet led me to Modular Origami, in which geometric constructions are built up from so-called modules. In the process, I also learnt (and am still learning) a bit about the mathematics peculiar to Origami. Much of this can be introduced to students in Classes Seven or Eight, as special projects. This year I also happened to give a simple Origami project to Class Nine, which was well received, and I include a description of that at the end of this paper.
What is Origami?
Origami (Japanese-ori: to fold; kami: paper) is the art of paper folding. By a sequence of folds, a flat piece of paper is turned into a stylized animal, flower, box, a decorative or an abstract design. The traditional categories include people, flora, and fauna. The classical models include the water bomb, crane and the flapping bird. There are many styles, from very simple, economical designs to extraordinarily complex works. In addition to conventional folding (Flat Origami), the art encompasses such genres as Modular Origami (many identical units combined to form decorative polyhedra), and Composite Origami (objects folded from two or more sheets of paper). Modular Origami presents many possibilities for mathematics teaching, and the following section describes several geometrical shapes that can be made.
Modular Origami
Modular or unit Origami is constructed from more than one piece of paper. The pieces of paper that make up one model are usually folded identically and are called modules. These modules interlock and stay together by a system of ‘pockets’ and ‘points’ (without the help of tape or glue). The process of constructing Modular Origami is like the working of an elegant puzzle, the end product being a polyhedron. To heighten the artistic element, one can select paper of various kinds and colours from which to construct models. One can have models coloured as symmetrically as possible with no two pieces of the same colour touching (which is quite a challenge!). Other choices include using all pieces of the same colour, or most pieces of the same colour with another thrown in at random here and there.
What is a polyhedron? Put simply a polyhedron is a three-dimensional figure made up of sides called faces, each face being a polygon. A polygon, in turn, is a two-dimensional figure made up of line segments, called edges, that are connected two at a time at their endpoints. In a polyhedron, several polygonal faces meet at a corner (vertex).
Polyhedra may be classified as:
- Platonic Polyhedra The Platonic solids are also known as ‘regular solids’ because of their high degree of regularity and symmetry. There are five of them: the tetrahedron, the cube, the octahedron, the dodecahedron and the icosahedron. The defining feature of such a solid is that each face looks the same as any other (each face is a regular poygon), and each vertex looks the same as any other; the number of edges that meet at a vertex is the same for all vertices.
- Archimedean Polyhedra These are also known as the ‘semi-regular solids’. The degree of symmetry or regularity of such solids is less than that of the regular solids. It has two kinds of polygons for its faces, and the way the faces join up at the vertices is the same for all vertices. Making a plane cut at each vertex of a regular solid gives rise to a semi-regular solid.
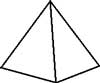 | 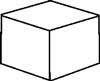 | 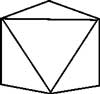 | |
| Tetrahedron (4) | Cube (6) | Octahedron (8) | |
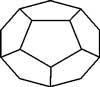 |  | ||
| Dodecahedron (12) | Icosahedron (20) | ||
Some of the polyhedra in this category include the truncated tetrahedron, cuboctahedron, truncated octahedron and the snub cube.
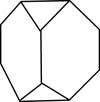 |  |
| Truncated tetrahedron | Cuboctahedron |
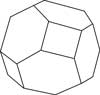 | |
| Truncated Octahedron | |
- Kepler-Poinsot Polyhedra Stellated dodecahedron (with two variations) and the great dodecahedron fall under this category.
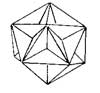 | 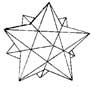 |
| Great Dodecahedron | Stellated Dodecahedron 1 |
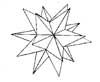 | |
| Stellated Dodecahedron 2 | |
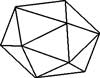
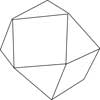
- Miscellaneous Polyhedra Some examples under this category would be hexadecahedron, truncated hexadecahedron (or ‘The Egg’) and a double tetrahedron.
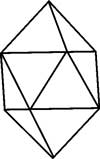 | 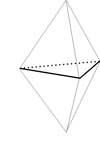 |
| Hexadecahedron | Double Tetrahedron |
Origami and Geometric Constructions
A comparison between straight edge/compass constructions and origami
In high school geometry students examine the types of geometrical operations that can be performed by using only an unmarked straight edge and a compass (SE&C). One learns how to draw a line connecting two points, how to draw circles, how to bisect angles, how to draw perpendicular lines, etc. In fact all SE&C constructions are a sequence of steps, each of which is one of the following:
- Given two points we can draw a line connecting them.
- Given two (nonparallel) lines we can locate their point of intersection.
- Given a point p and a length r we can draw a circle with radius r centered at the point p .
- Given a circle we can locate its points of intersection with another circle or line.
This list of axioms encompasses everything one can do with a SE&C. That is, anything one does with a SE&C can be broken down into a sequence of the above operations. Using this axiom list, one can begin to talk about things that cannot be done using a SE&C. For example, students are traditionally told that certain things are impossible to do with a SE&C, like trisecting an arbitrary angle, or doubling the volume of a cube (i.e. constructing the cube root of 2). Hearing this usually makes students spend hours and hours trying to trisect an angle using SE&C, but this has been mathematically proved to be truly impossible! However, we can make geometric constructions with Origami, using the side of the paper as the straight edge and folding up to an angle to simulate a compass. Furthermore, trisecting angles and doubling cubes is possible with Origami! Analyzing this can lead to a greater understanding of why these things are impossible with SE&C.
There is a more historical context in which one can view Origami constructions. Although SE&C is not enough to trisect angles, one can trisect angles if we allow ourselves to use a ruled straight edge. In classic SE&C constructions the straight edge is used only to make a straight line, but mathematicians as far back as Archimedes knew that if two marks were made on the straight edge (for measuring) then trisections could be performed. In this view it makes perfect sense that Origami constructions allow things like trisections, since the straight edge of the paper could easily be ‘ruled’ by pinching the half, quarter, one-eighth, ... divisions along the side. Yet so far no detailed comparison between Origami constructions and ruled SE&C constructions has been made.
Huzita’s Origami Axioms
In 1991, the Italian-Japanese mathematician Humiaki Huzita formulated six axioms of paper folding, each abstracting an operation feasible with a piece of paper.
Axiom 01
There exists a single fold connecting two distinct points.
(This corresponds to the first of Euclid’s Postulates)
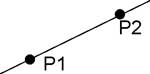
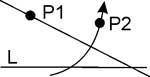
Axiom 02
Given two points P1 and P2, there exists a unique fold that maps P1 onto P2.
(This corresponds to drawing the perpendicular bisector of the segment P1P2 in the usual manner)
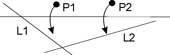
Axiom 03
Given two creases L1 and L2, there exists a unique fold that maps L1 onto L2.
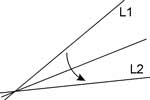
(This corresponds to drawing the bisector of the angle enclosed by the rays OL1 and OL2)
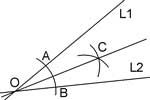
Let O be the point of intersection of L1 and L2. From O, along L1 and L2 measure equal segments OA and OB. Draw two arcs of equal radii centered at A and B till they intersect at C. OC is the angular bisector of the angle defined by L1 and L2 in case they intersect.
Axiom 04
Given a point P and a crease L, there exists a unique fold through P perpendicular to L.
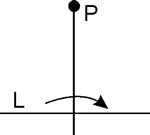
(This corresponds to drawing a perpendicular from a point to a line.)
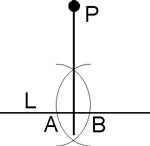
(Find two points A and B on L equidistant to P. With centers at A and B, draw two arcs of equal radii till their intersection. Each of the cross points lies on the sought perpendicular.)
Axiom 05
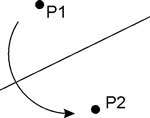
For given points P1 and P2 and a crease L, there exists a fold that passes through P1 and maps P2 onto L.

(With radius P1P2 and center P1, draw an arc till it intersects L at point A. Drop a perpendicular from P1 on AP2 (Axiom O4))
Remark:
Obviously the construction is only possible if the length of P1P2 is not less than the distance from P1 to L. Therefore, Axiom O5 can’t universally hold. Also, there could be two folds that do the needful, because the circle with the center P1 and radius P1P2 will have (in general) two points of intersection with line L.
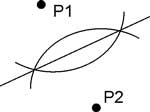
Axiom 06
Given two points P1 and P2 and two creases L1 and L2, there exists a unique fold that maps P1 onto L1 and P2 onto L2.
Angle Trisection By Paper Folding
The following method of angle trisection is credited to H. Abe.
Let’s consider an acute angle ABC.

By means of Axiom O4, execute a crease through B perpendicular to AB. (Note that, according to O1, AB may be considered a crease.) Execute two creases parallel to AB and at equal distances from each other: BD = DE.
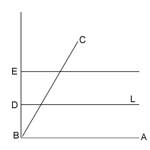
By using O6, fold E onto BC and B onto L. Let B1, D1, E1 be images of points B, D and E, respectively. Let L1 be the image of crease L. Refold it to make a crease on the upper part of the paper. Straighten the paper to its original position and fold and unfold crease L1 again. We next show that the crease passes through the point B and, moreover, divides ABC in the ratio 2:1 thus solving the trisection problem.
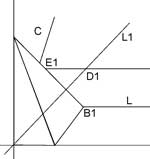
The whole configuration is symmetric in the crease OOB ; the crease acts like a mirror. Let the fold send D1 to D and B1 to B, and therefore line DB1 to line BD1; that is, it sends line L1 to line L. Therefore it also sends line L to line L1.
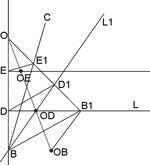
Now observe that angles ODBB1 and ODB1B are equal (by symmetry in crease OOB), and angles ODB1B and B1BOB are equal (alternate angles); therefore angles ODBB1 and B1BOB are equal. Since ED = DB and B1D is perpendicular to EB, it follows (once again, by symmetry in crease OOB) that E1D1 = D1B1 and BD1 is perpendicular to E1B1. So angles E1BD1 and D1BB1 are equal.
Therefore angles E1BD, D1BB1 and B1BOB are all equal, and we have succeeded in performing the trisection.
A Project in Origami for Class Nine
Some typical attributes of the nature of Origami are listed below.
- Creating an Origami model involves following an exact procedure.
- The procedure involves the spatial manipulation of the paper.
- Different models can be related to one another by examining the modifications of general procedures.
- Teaching the creation of a model involves communication, either orally or through directions (text and diagrams), or perhaps computer based multimedia.
- Teaching in Origami, by nature and convention, is cooperative, applied, and student-centred.
The objectives of the project I conducted with Class Nine were the encouragement and promotion of the following:
- study of open-ended problems
- diversity of solutions
- visualization skills
- students’ ability to make generalizations on the effects of folds
- mathematical discourse: students ‘talking’ math
- attention to topics such as geometry and spatial relations
- peer teaching and collaboration.
This project had two parts to it. In the first part one had to make a Basic Box, beginning with a square paper, with the help of twelve illustrated steps. In the second part the student had to experiment as broadly as possible with the variables involved. The idea was not just to make a sensible box, but to see to what extremes one could push the Basic Box, even to a point where it wasn’t a box at all! Some interesting facets I came across at different stages during the project are mentioned below.
In the beginning many students found out to their dismay that the boxes, most made from notebook paper, were ‘weak’ structures. In other words the walls or sides would cave in or bend outwards because the paper wasn’t strong enough to hold the crease. This led to experimentation with different kinds of paper. They discovered that too thick a paper was also not suitable as the crease would crack and eventually tear with subsequent folds.
The idea of strengthening a box made from a thin sheet of paper also emerged in discussions amongst students. Some suggested doubling the paper before starting the folds, and another added a new intermediary fold to strengthen the structure.
During the second phase of the project students tried out regular shapes for the sides of the Basic Box, such as a rectangle, a rhombus and even a triangle. They also played around with the subvariations at each step. As a result there were sloping and leaning boxes, shallow and deep boxes, short and long boxes and boxes on legs too. A few of them experimented with a circular piece of paper and ended up with a rocking box! With irregular shapes of paper, they came up with unorthodox boxes (difficult to describe), some aesthetically pleasing and some not.
Two students extended the twelve-step process to such a degree that each made a box with a lid on a hinge fitting neatly onto the top. It is important to note that this box was made entirely by folding and creasing a single precut sheet of paper. One of the student’s models was accompanied by an excellent step-by-step illustrated write-up of the process.
When I look back I think introducing a project such as this was worth the while. It not only generated discussion, experimentation and creativity amongst a large section of students but also an element of playfulness and a sense of achievement.
References
- Arnstein, Bennett and Gurkewitz, Rona. 3-D Geometric Origami, Modular Polyhedra. Dover Publications Inc., 1995.
- Courant and Robbins. What is Mathematics? New York - Oxford Univ. Press, 1941.
- Fusimi K. ‘Trisection of angle by H. Abe’ (in Japanese), Science of Origami, a supplement to Saiensu (the Japanese version of Scientific American) Oct. 1980.
- Smith J ed.‘Understanding Geometry through Origami Axioms’ in the Proceedings of the First International Conference on Origami in Education and Therapy (COET91), British Origami Society, 1992.
- Microsoft® Encarta® Encyclopedia. © Microsoft Corporation; Various sources from the Internet, 1993-2001.